Year 11 Learning Sequence
This creative process responds to Unit 1, Area of Study 2 from the VCE studio arts study guide. It follows on from my response to Unit 1, Area of Study 1 that can be found at ECA734 annotated creative process where I examined prehistoric cave art. I am interested in the notion that some ancient artists were in a process of self-actualisation (achieving one’s full potential) as defined by Abraham Maslow in his hierarchy of needs.
I wanted to investigate creative frontiers and experiment with creative processes and techniques I have had no experience with. These are seen in entries/lessons one to four below.
1.EXPERIMENTAL MARK MAKING AND AUTOMATIC DRAWING.
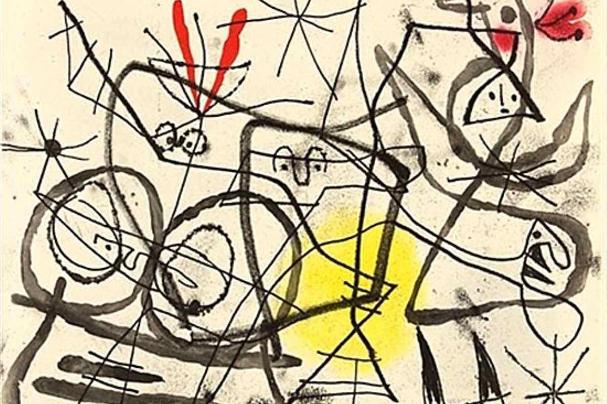
Here is a painting by Historic Contemporary Artist., Joan Miro called ‘Preparation of the birds’.
Automatic drawing has its roots in Surrealism. Artists devise different ‘rules’ that they apply to producing an automatic drawing. This practice is undertaken often to tap into the subconscious of the artist.
This is an Automatic Drawing art work by a Modern Contemporary Artist called Carol Heft. I engage strongly with her filigree, informal lines and the looseness of her drawing.
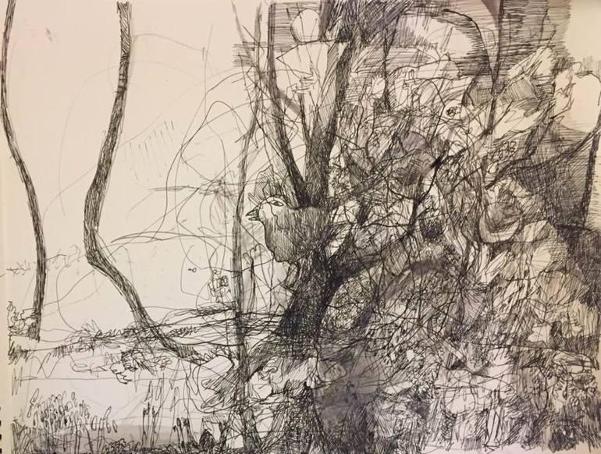
Carol Heft. 2018, Magic Tree. Drawing, pen and ink on paper. 11 x 14 inches. https://carolheft.com/
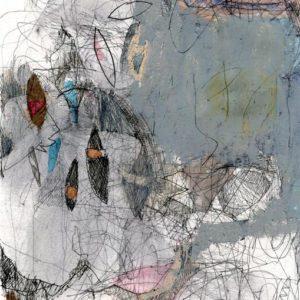
Carol Heft. Automatic drawing #4, 12 x 9 inches, 4.24.18Pen and ink, oil pastel.
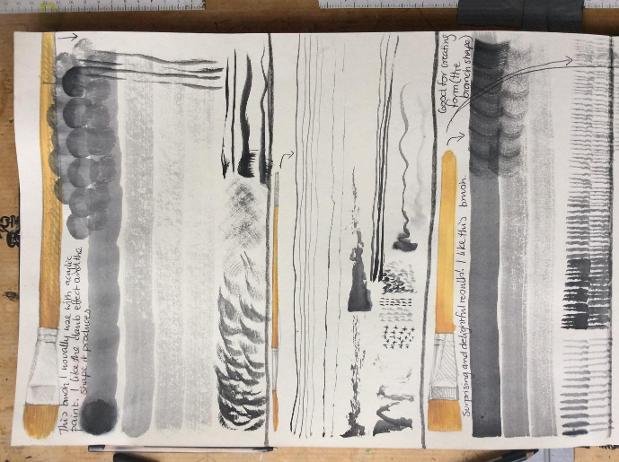
MY MAKING – I began this creative process with experimental mark making. Materials: white paper/Visual diary, pencil, graphite crayon, various brushes, sharpie, coloured pen, watercolour, ink. I then produced an Automatic drawing using my dominant hand (Left).
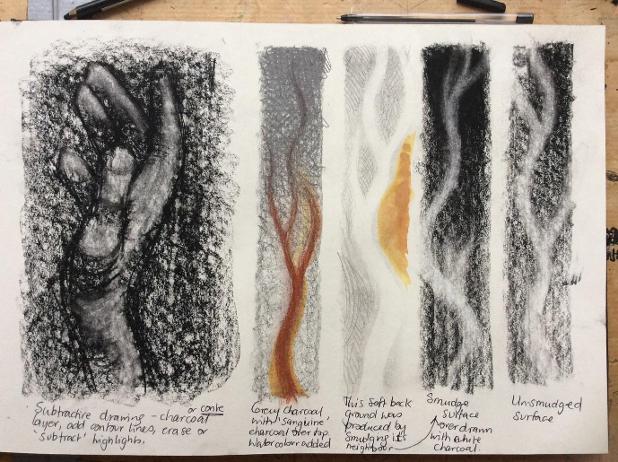
Below I produced a small charcoal sketch where I applied the subtractive technique to produce the high lights in the drawing. To achieve this, you erase the charcoal wherever you want your drawing light. It is best to use a heavier gsm paper so you don’t damage the drawing surface.
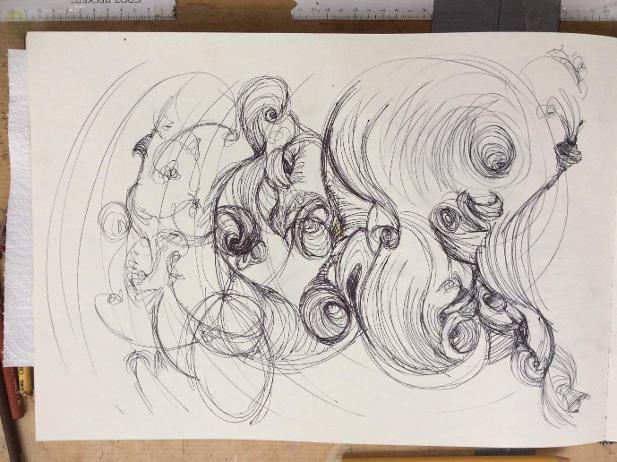
Below is my Automatic drawing. I was listening to inspiring music while I drew.
I felt it would benefit from the addition of colour. It has a Kandinsky – esque feeling to it now.
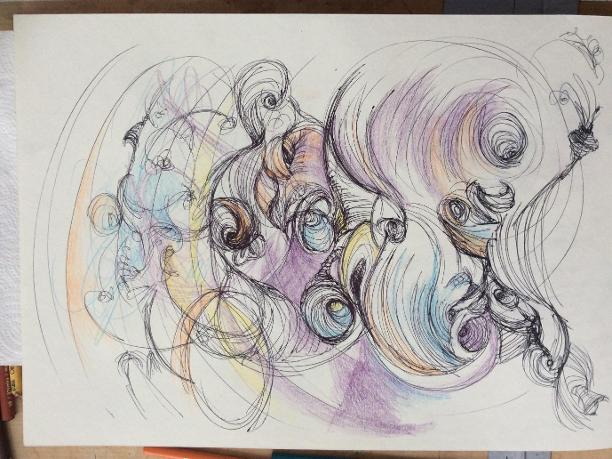
Ingrid Schmidt, Automatic Drawing. 2019, pen on paper and colour pencil.
MY RESPONDING – The art elements and principles seen in this art work are line, colour, movement, repetition and form. The aesthetic quality it conveys is a mystical atmosphere through the swirling, hypnotic lines, the dreamy colours. The black lines also communicate a sense of movement.
LESSON 1 – Mark Making and Automatic Drawing
Making – Experiment with a variety of art materials to produce as many different marks as you can.
Now watch video from 2.14 sec in, watch this video presentation of Automatic drawing.
https://www.youtube.com/watch?v=MJYGFwGhHnA
Now with graphite crayons on cartridge have a go at an automatic drawing of your own while listening to the below music. Once you’ve finished with graphite, consider adding gouache or water colour. Start small and slow. Be led by your instinct about what and where to add.
Listen to Ayasa D Aahakiran 17 – Malte Marten (Yatao) while you draw, let the sounds you hear guide your pencil.
https://www.youtube.com/watch?v=6f84KdH8FTk
- the characteristics and properties of a variety of materials and techniques in a selection of art form/s
- a range of art elements and art principles to create aesthetic qualities in a selection of art form/s
- the materials and techniques used to produce a range of effects
Responding – Examine your art work. What aesthetic qualities des your art work display? Do a good/bad/interesting analysis. Write your findings in your visual diary.
-
progressively evaluate and record in a visual diary the exploration and development of subject matter, art elements, art principles and use of materials and techniques to present aesthetic qualities
Differentiation
- Extending – Consider adding oil pastel to your automatic drawing once the watercolour has dried.
- Streamlining – Produce an automatic drawing with retractable drafting pencil on a piece of paper no bigger than A4.
2. BILATERAL DRAWING.
This is an image of Bilateral Drawing Artist, Tony Orrico producing an art work. He extracts everything there can be taken from graphite as an art medium. He holds a pencil, pen or crayon in each hand and draws with both hands producing a mirror image. I found that I could do this with a reasonable amount of proficiency and produce art work I was satisfied with after a few attempts.
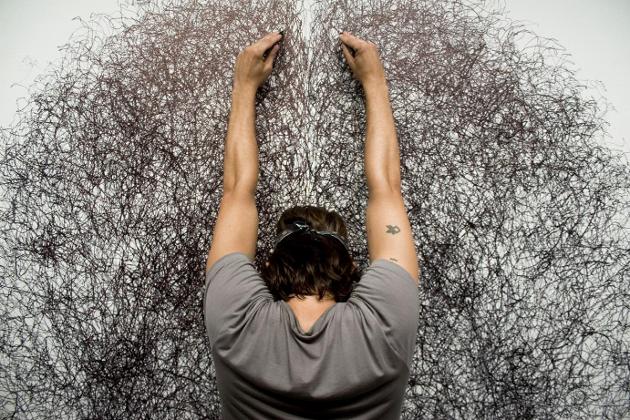
Tony Orrico, unison symmetry standing | Photo by Michael Hart | Edition of 8 | 40″ x 26”
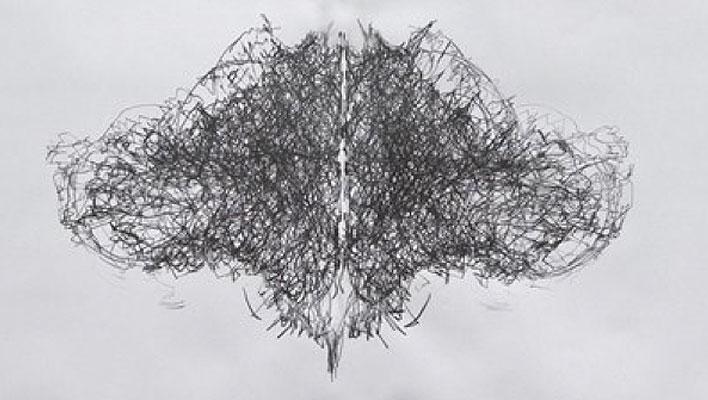
Penwald: 11: unison symmetry sitting. 2011 performance. Graphite, paper. 1 hour. 60x60 inches https://tonyorrico.com/penwald-drawings/archive/
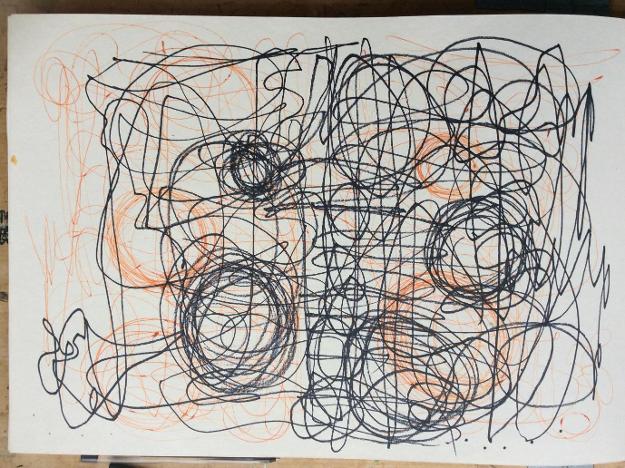
My first bilateral drawing was a bit of a disappointment. On reflection, I should have started smaller and used the same medium in both hands. This drawing was done with a sharpie and an orange pen.
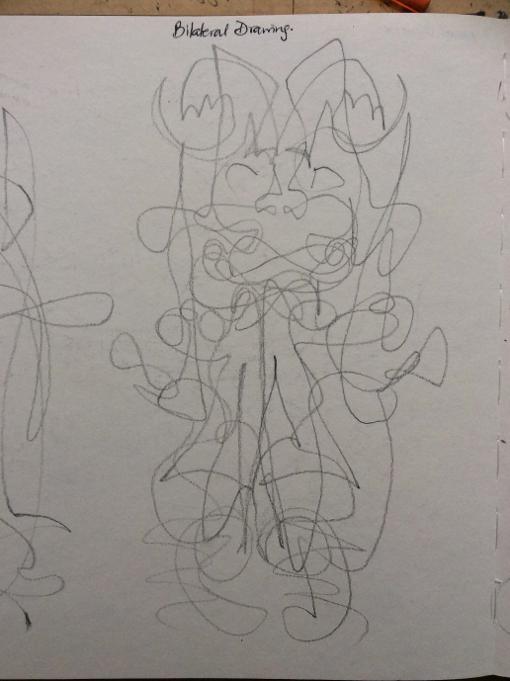
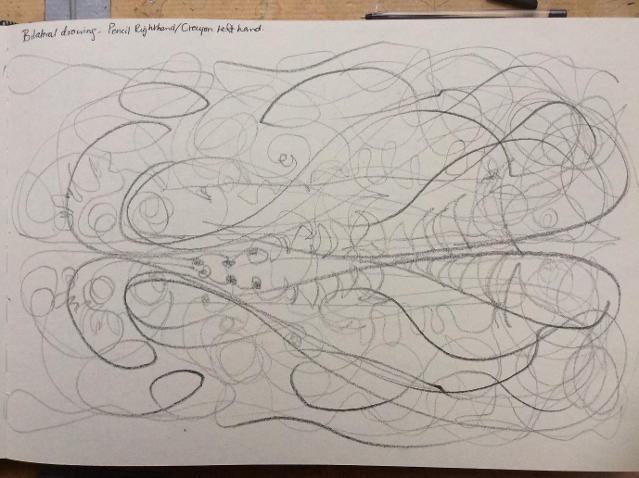
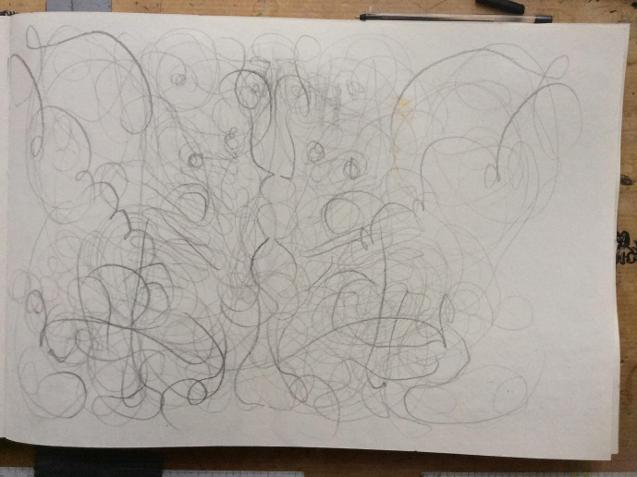
I decided to try drawing something representational to see if I could do it.
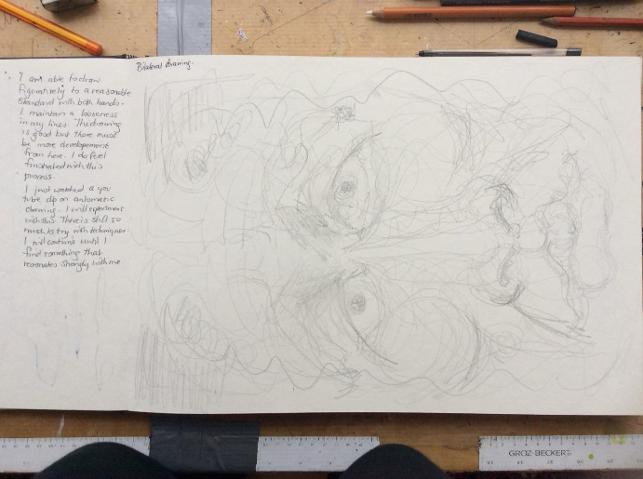
I feel there is a lot of development to be had with bilateral drawing. I would like to try figurative drawing with charcoal on brown paper with this technique.
MY RESPONDING – I have found that if I’m not drawing in my visual diary, I need to stick the paper down as it moves when I begin drawing on it and that defeats the purpose of getting a symmetrical drawing. The art elements and principles that appear in these art works are balance, rhythm, unity, shape and tone. The aesthetic qualities seen in these art works are that they are progressively dreamy in appearance. The curving, repeated lines communicate a sense of rhythm and the symmetry is unifying. While they are pleasant to look at, they are not engaging for long.
LESSON 2 – Bilateral symmetry drawing
Making – While listening to the Buddhist chant below, try a bilateral drawing on small piece of paper taped to your table. Then attempt a large one. Consider using a different medium.
OM Chanting at 432Hz (Female version)
https://www.youtube.com/watch?v=Ua2-zCo9iNE
For the larger bimanual drawing try listening to:
Dubstep Violin – Lindsay Stirling – Crystallize HD and EQ
https://www.youtube.com/watch?v=P-yGqJCOJxw&list=RDP-yGqJCOJxw&start_radio=1&t=111
- the characteristics and properties of a variety of materials and techniques in a selection of art form/s
- a range of art elements and art principles to create aesthetic qualities in a selection of art form/s
- the materials and techniques used to produce a range of effects
Responding – Examine your art work. What art elements and Principles did you use? Do a good/bad/interesting analysis.
-
progressively evaluate and record in a visual diary the exploration and development of subject matter, art elements, art principles and use of materials and techniques to present aesthetic qualities
Differentiation
- Extending – Produce a bilateral drawing with large paper taper to the wall that extends to the floor. Do first pass standing and a second pass sitting.
- Streamlining – Use two light coloured twistable crayons on an A3 size paper taped to your desk to produce a bilateral drawing. Work slowly.
3. BIMANUAL DRAWING.
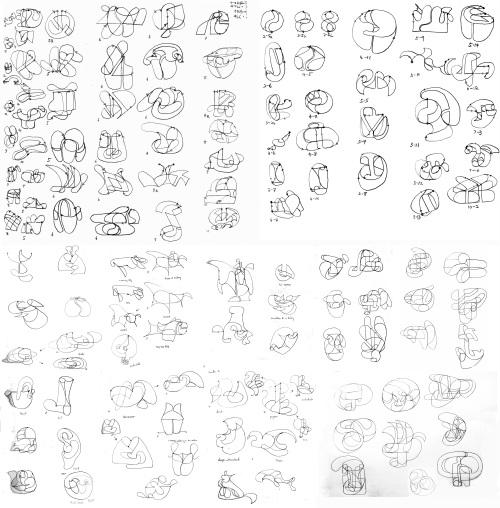
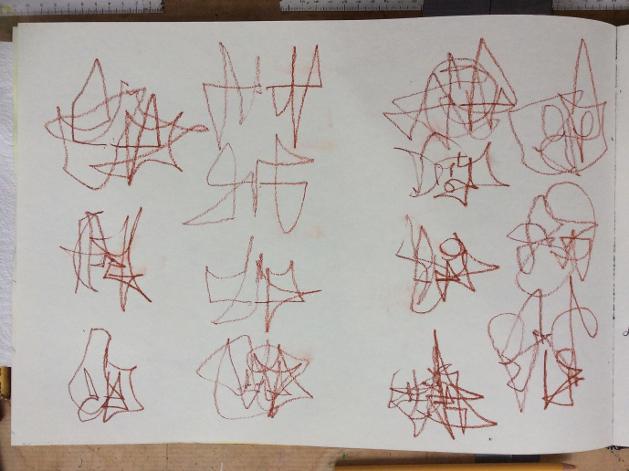
Below are bimanual drawings produced by an artist and university lecturer called Eiichi Tosaki. He has been studying Bimanual Combination Drawing and the fact that it creates synapses in the brain which is excellent for progress and understanding for the last 30 years. I thought I would really enjoy the process of drawing abstract little figures but I actually found I didn’t like it much at all.
About BCD:
‘I have developed my own understanding of bi-manual drawing in the context of studio practice, working initially with conventional media for more than 30 years. The aim is to generate a variety of configurations or patterns according to the number of strokes/beats, which are interpreted and analysed as forms of rhythmic structure. It is a pure drawing, in the sense that it is non-referential, gestural, non-painterly, non-semantic, flow itself, and against-shape. It is pure rhythm and “Do Zen” or active Zen meditation’ Eiichi Tosaki.
https://bimanualdrawing.wordpress.com/about/
Tosaki has a pencil in each hand. When he draws, each hand draws independently of the other, that is, each hand makes different marks to the other.
MY MAKING - Because I don’t feel like I was making much progress, I decided to draw for longer and with varying weight on my pencils.
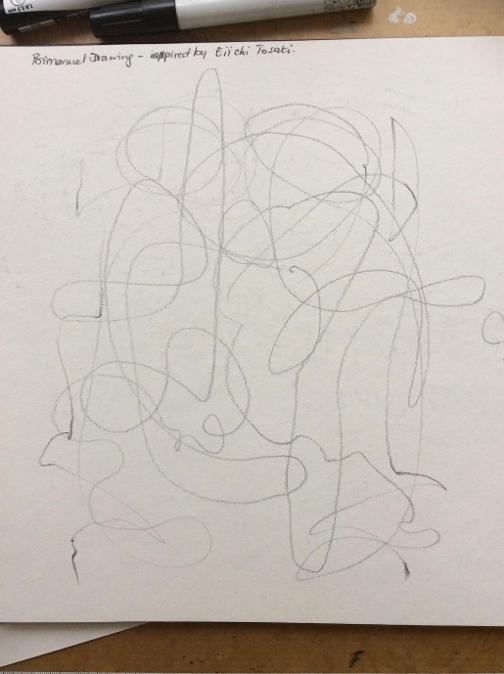
This is an improvement on the tiny drawings above as it holds more interest for me. It seems you have to be conscious of when you need to stop.
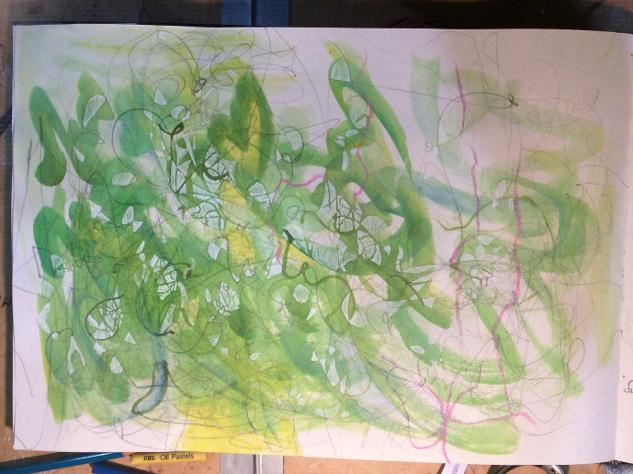
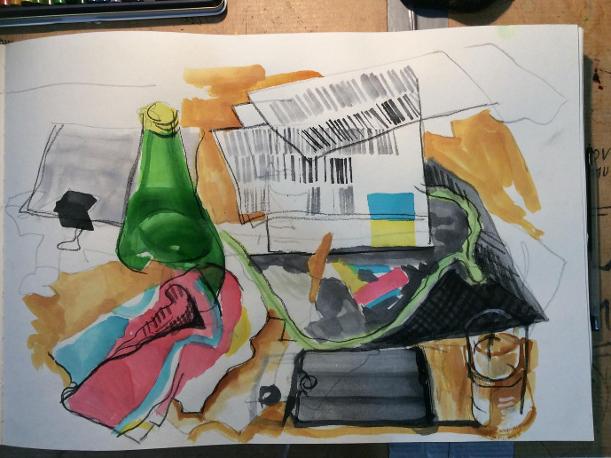
Below is my first mixed media bimanual drawing. With Carol Haft’s delightful Automatic drawings in mind with their layers of pencil, watercolour and oil pastel, I used the same media as Heft.
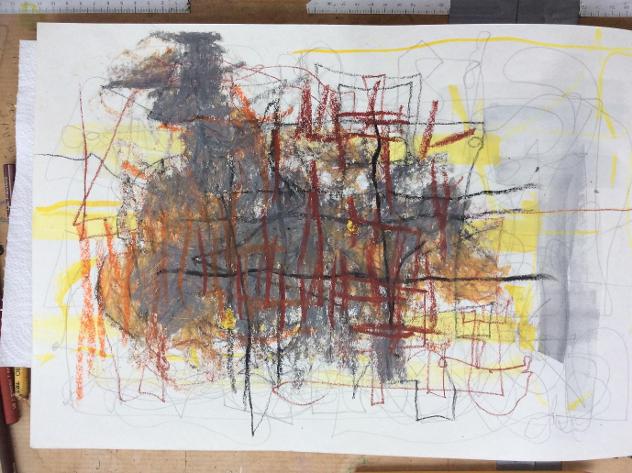
I think this art work has an industrial atmosphere. On reflection, I think it needs more white and possibly some typed text in the form of collage. This is a very interesting process as I have always produced figurative, recognisable art work.
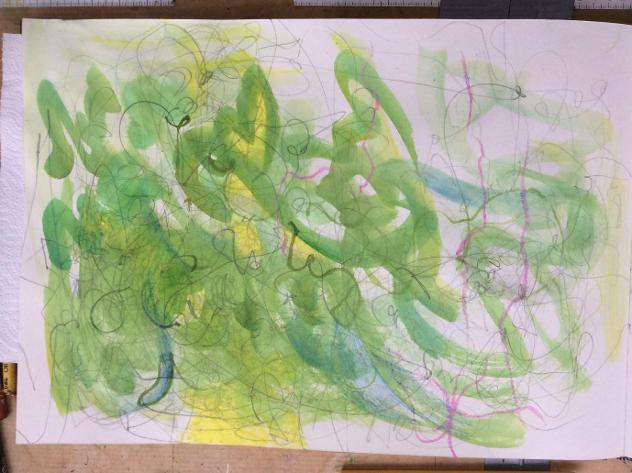
I began to produce this artwork by starting with bimanual drawing with graphite pencils while listening to music. I added watercolour wash, dried it with a hair dryer and then brought in some yellow oil pastel. Then I added blue water colour pencil and pink oil pastel. I felt the drawing was lacking detail and interest. I decided to add white pigment ink pen. The results are below. While I am pleased with the final product, I won’t use oil pastel next time as it is incompatible with the white pigment ink pen which I really love.
MY RESPONDING – The freedom of Bimanual Drawing is very liberating. You approach the process with no expectations because you can’t have expectations. It is truly a space where anything could happen and you give yourself permission to make something you’re not going to be happy with because you have almost no control. When it works, it is incredibly validating and affirms you as an artist.
The art elements and principles used in this art work are colour, shape, movement and light. The aesthetic qualities of this artwork produce a sense of well-being and atonement with nature. The white spaces are like windows in tree canopy foliage letting light through. The relaxed enthusiastic lines convey movement. The green is pleasing to the human eye.
LESSON 3 – Bimanual Drawing and Mark Making
Making – watch this BCD (bimanual coordination drawing)
https://www.youtube.com/watch?v=qzQ3UMOfagk
Listen to Instrumental Gayatri Mantra Flute, Sitar & Santoor
https://www.youtube.com/watch?v=C42cgdh1-1k
Draw to a beat, as you listen to the music, every fifth beat change direction with your drawing. Have no expectations of yourself or with the art you produce with this. The main purpose of this exercise is to increase the synapse (lines of communication) between the two hemispheres of your brain.
Try a longer drawing. Start with pencil. Move to watercolour wash, coloured pencil applied carefully. Finish with gouache in white (or perhaps a colour) in thoughtfully chosen stops.
- the characteristics and properties of a variety of materials and techniques in a selection of art form/s
- a range of art elements and art principles to create aesthetic qualities in a selection of art form/s
- the materials and techniques used to produce a range of effects
Responding – Examine your art work. How did this activity make you feel? What emotions is the artwork raising in you? Do a good/bad/interesting analysis. Write your findings in your visual diary.
-
progressively evaluate and record in a visual diary the exploration and development of subject matter, art elements, art principles and use of materials and techniques to present aesthetic qualities
Differentiation
- Extending – Pick the bit you like from your art work and enlarge it on a photocopier. Add lots of oil pastel to it and then scratch into the pastel.
- Streamlining – Photocopy your work after the graphite layer. Test out some various colour schemes before working up your original.
4. BLIND CONTOUR DRAWING.
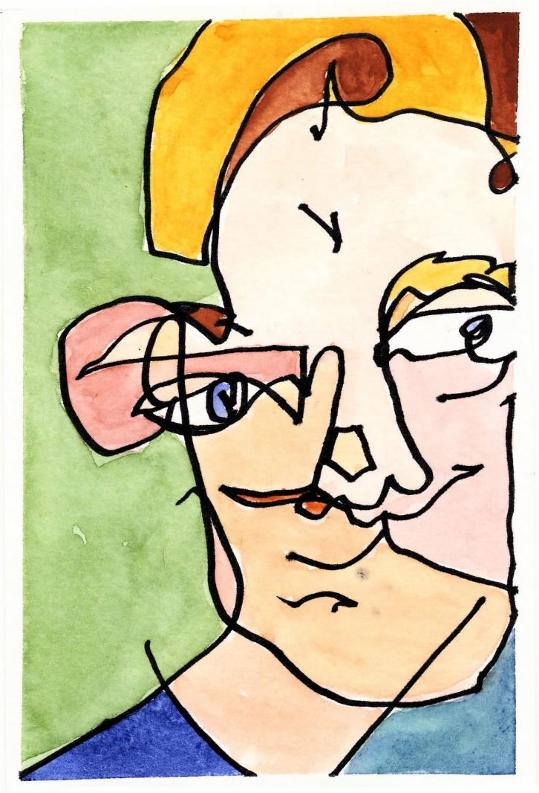
My fourth experiment was with blind contour drawing which is an excellent warming up exercise. It hones your ability to observe in preparation for art making. I like to begin with observing my subject matter for about two minutes. By this I mean, you look at, and draw in your mind every contour or edge you can see in your subject. Then you simply put pencil to paper and draw what your eyes are seeing without looking at the paper, thus the name ‘blind’ contour drawing. You will have a disjointed drawing but there is undeniable charm in these drawings. They sometimes look like Picasso’s expressionist artwork.
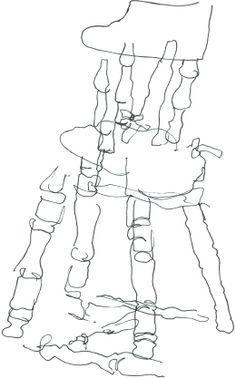
Here’s blind contour drawing of a colonial style chair.
I like this idea of working some colour into the artwork. I will try this with one of my blind contour drawings.

MY MAKING - Here is a blind contour drawing of a lily I made. Below is a photograph of my uni text books, pencil case, water bottle etc. Below that is a blind contour drawing I made of the still life.
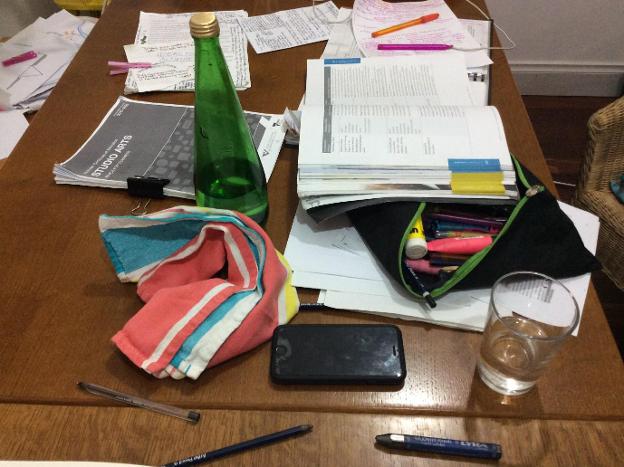
Here I have worked into the drawing with watercolour and charcoal pencil. I am pleased with the distorted forms of the elements. The rhythmic overlapping lines and the colour of the forms give the artwork a playful, disorienting aesthetic. This has a cubist aesthetic via the slightly unsettling angle of the objects.
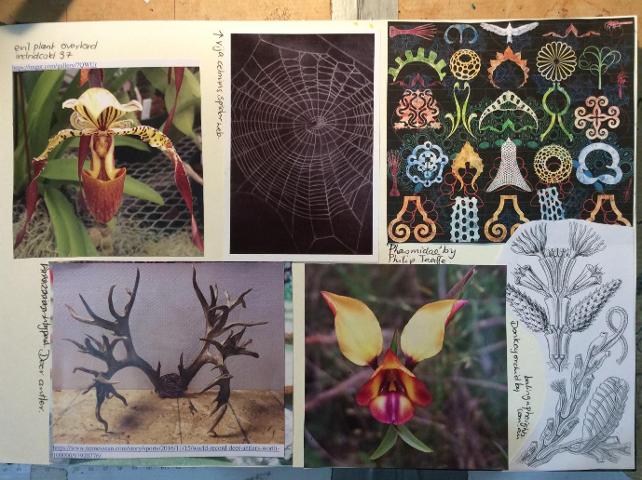
An artist of inspiration for me is Philip Taaffe, who produces art works that utilise repletion and unity. Of Particular relevance to me is his art works that demonstrate a strong sense of balance and symmetry.
The below artwork is by Philip Taaffe. I find his artworks based on elements from nature to be very engaging. While Taaffe’s paintings aren’t blind contour paintings, they are symmetrical which I am really interested in. We have been looking at symmetry in nature for 100’s of thousands of years. In faces, bones, flowers, fern fronds, antlers and horns, even water ripples.
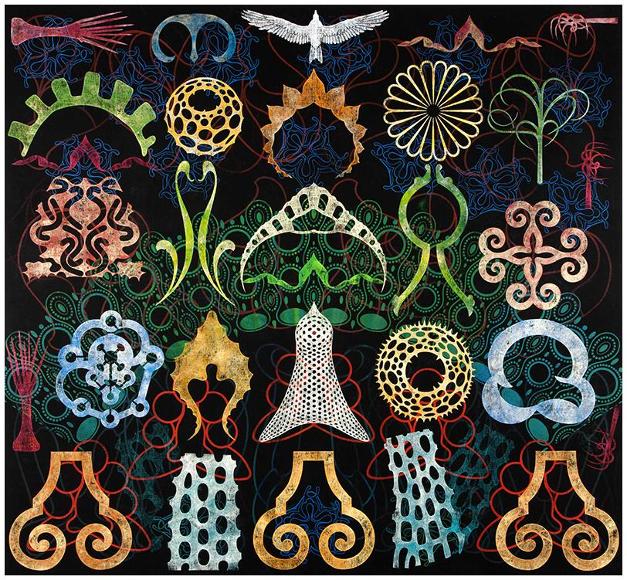
Philip Taaffe. Artificial Paradise (Tumulus), 2008
I am very interested in combining bilateral drawing and figurative drawing with subject matter that is symmetrical.
Below I have produced blind contour drawings of a symmetrical vertebrae bone I found on the beach, first with my left (dominant) hand, then my right (non-dominant) hand, then a blind contour bilateral drawing (with both hands).
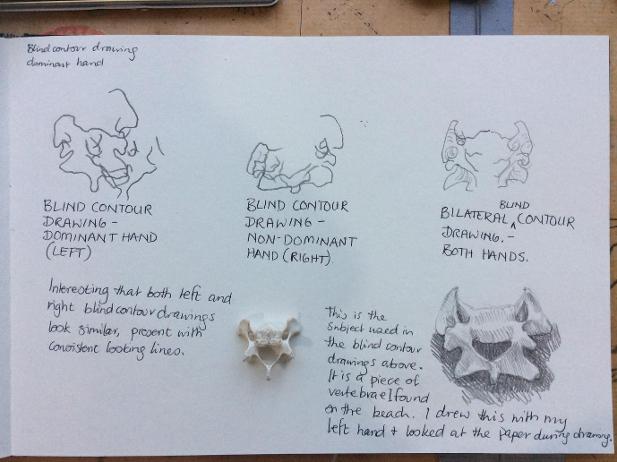
MY RESPONDING - I thoroughly enjoyed blind contour drawing, bilaterally but even more so with my dominant hand. I find the expressive lines very engaging. There is a real intuitiveness expressed in the aesthetic qualities of the lines feeling out the shapes of the subject matter. I really enjoyed developing the drawing with other media in the still life of ‘Uni text books’. I would like to explore bilateral blind contour drawing further, focusing on symmetry in nature. I am concerned that a bilateral blind contour symmetrical drawing won’t be recognisable but maybe that will increase interest.
LESSON 4 – Blind Contour/Symmetry Drawing with dominant hand and non-dominant hand
Making – Choose a subject you are interested in. It’s best if you draw the actual object rather than a photograph of it. Arrange it in a pleasing position and look at it for two minutes, trace along each contour with your eyes, spend two minutes observing. The on at least an A3 size paper, do a blind contour drawing. Spend 5 minutes drawing your subject. Listen to Nusrat Fateh Ali Khan and Eddie Vedder – The Long Road.
https://www.youtube.com/watch?v=-b33vOZKcS0
Now develop your art work with art mediums, for example, watercolour, gouache, coloured pencil, and charcoal and/or oil pastel. Listen to some lively Indian cultural music - Aankh Uthi Remix – Nusrat Fateh Ali Khan
https://www.youtube.com/watch?v=8dM3HVIxyMI
- the characteristics and properties of a variety of materials and techniques in a selection of art form/s
- a range of art elements and art principles to create aesthetic qualities in a selection of art form/s
- the materials and techniques used to produce a range of effects
Responding – Reflect on how you felt about the blind contour drawing exercise. Write your thoughts in your Visual diary. Note findings about art mediums and the order to use them in.
-
progressively evaluate and record in a visual diary the exploration and development of subject matter, art elements, art principles and use of materials and techniques to present aesthetic qualities
Differentiation
- Extending – Try drawing your subject with your non-dominant hand.
- Streamlining – Do a blind contour drawing very lightly with pencil. When you’re finished, choose which lines to define with a dark graphite pencil or a sharpie (permanent pen).
5. REFLECT ON MEDIUMS, MATERIALS AND TECHNIQUES.
MY RESPONDING – I reviewed the explorations undertaken and determined that the bilateral drawing and figurative drawing with subject matter that is symmetrical resonated the most strongly with me. The media and materials I engaged with well where charcoal and white pigment pen. The technique I enjoyed using was the subtractive charcoal drawing. I particularly liked this method because the charcoal is an ancient drawing media and the black is so dense and rich. I want to draw attention to the wonder and awe of symmetry in nature and pay homage to our ancient ancestors that invented drawing because they noticed and appreciated that which was around them.
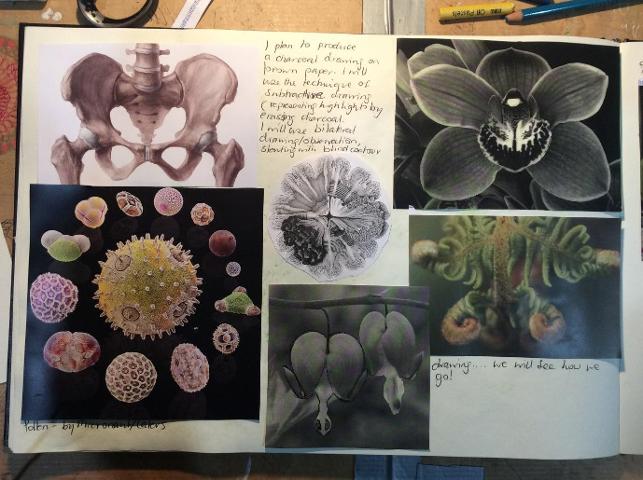
I intend to experiment with bilateral, blind contour drawing as well. I am sourcing my subject matter from what I imagine ancient artists would have observed and engaged with strongly in their environment. I wonder if they experienced a sense of awe and wonder at the symmetry in familiar objects like clan members’ faces, flowers and plants, bones, spider webs and the horns and antlers of regional animals. I plan to produce this art work on brown or mid grey paper
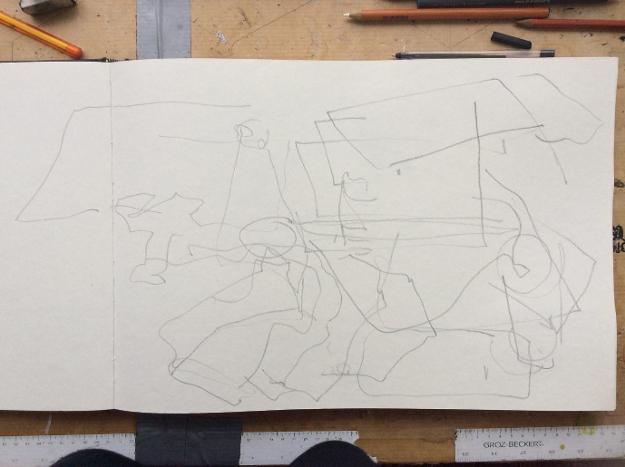
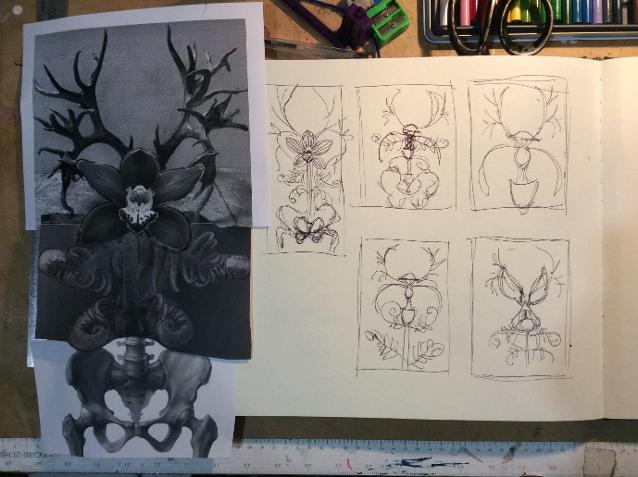
Below is my reference material. With these, I produced thumb nails (small sketches) to trial different formats for my final drawing. Once I had the configuration right, I went to my image document on my laptop and scaled the individual images up to make them work together well for sketching more accurately.
MY MAKING – Here are the thumbnail sketches I produced to develop my final artwork.
LESSON 5 – Reflect on Techniques and materials, collect subject matter and create thumbnails of final art work
Responding – Here’s where you collect lots of images and produce a two page spread for inspiration.
Reflect on and record in your visual diary, why these images might hold meaning for you. Review explorations undertaken – which exploration resonated the most strongly for you? Which material resonated the most strongly for you?
Which technique resonated the most strongly for you?
Most importantly, what do you want to say/talk about/represent in your artwork?
- develop individual subject matter from sources of inspiration, observations, experiences and artistic influences
- progressively evaluate and record in a visual diary the exploration and development of subject matter, art elements, art principles and use of materials and techniques to present aesthetic qualities
Making – Produce and refine thumbnails of your final artwork and consider how you can use the materials and techniques you have experimented with in a new way. Listen to this cultural music while you sketch your thumbnails. Amazing duet of Afghani Rabab and Cello Yaron Peer
https://www.youtube.com/watch?v=HxHQJhflapM
-
the materials and techniques used to produce a range of effects
Differentiation
- Extending – With your favourite artwork you produced and the techniques you used in mind, think about a way to extend or improvise the technique or material you used. Do a small experiment.
- Streamlining – Look at the artwork you produced. Which was your favourite? Listen to your imagination, what sort of art work would you like to produce? Find pictures on the internet and print them for reference.
6. PRODUCTION OF FINAL ARTWORK.
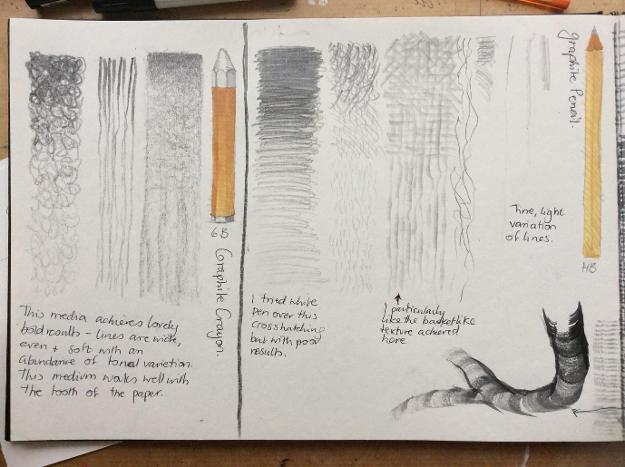
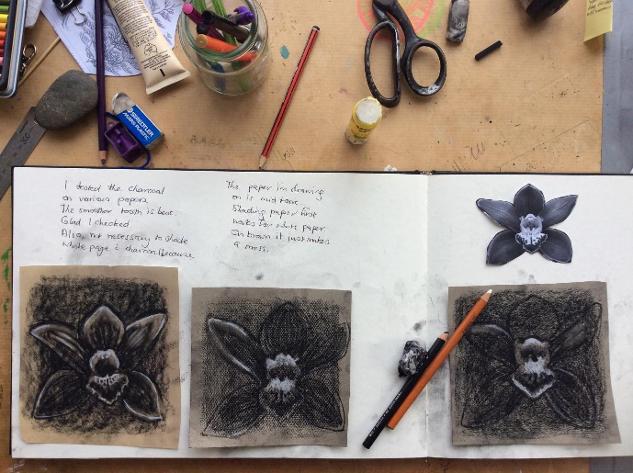
MY RESONDING– I tested the subtractive drawing technique with charcoal on 3 different paper surfaces to ensure I’d be happy with the results. One of the papers was very smooth and not very heavy, the other had a greater gsm (grams per square centimetre) and a heavy tooth (lots of texture) on one side and less tooth on the other. I chose the lighter tooth on the thicker paper.
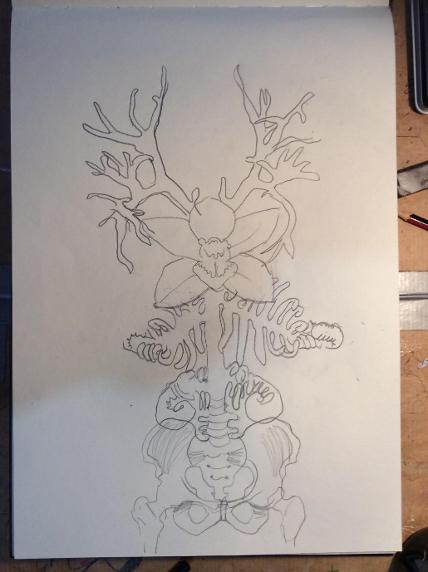
MY MAKING - I began my final artwork with bilateral unsighted contour drawing. I found I did need to look at the paper sometimes as I intended that my subject matter was recognisably symmetrical.
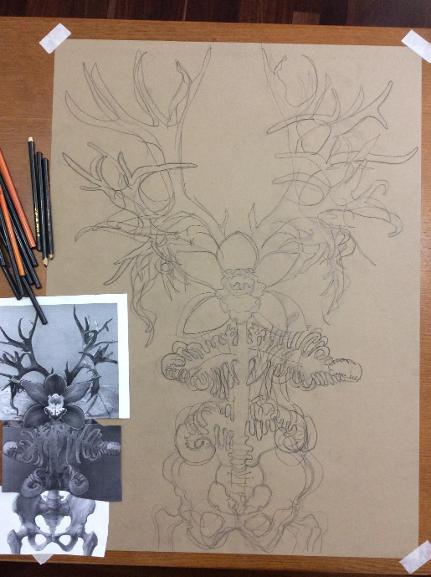
Then I threw myself into drawing. When I took the picture below, I had worked on my drawing for about 4 hours.
LESSON 6 – Commence final art work
Making – Work on your final artwork in this lesson. Photograph and print or photocopy your art work if you get stuck, so you can test out different options on the photocopy and then proceed.
Listen to Bjork – Frosti (extended). This instrumental piece plays for 15 minutes.
https://www.youtube.com/watch?v=-W_lKwsgHG8
-
Produce at least one finished artwork.
Responding – Record your process in your visual diary. Consider what aesthetic qualities are being used to greatest effect in this art work. Note your findings in your visual diary for using to compose your final evaluation.
-
progressively evaluate and record in a visual diary the exploration and development of subject matter, art elements, art principles and use of materials and techniques to present aesthetic qualities
Differentiation
- Extending – Consider what ways you might enhance the aesthetic qualities of your art work.
- Streamlining – write down the steps you took today to produce your art work. Write
7. PRODUCTION OF FINAL ARTWORK CONTINUED.
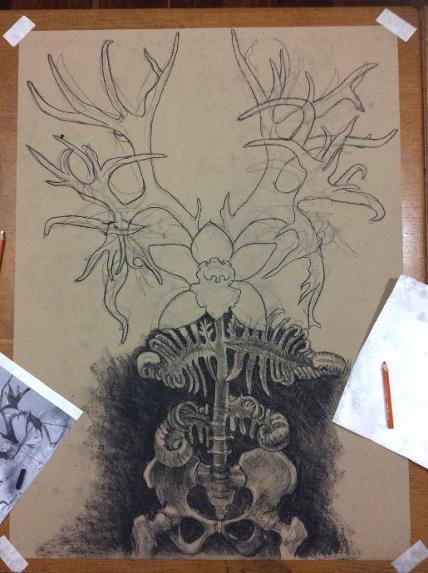
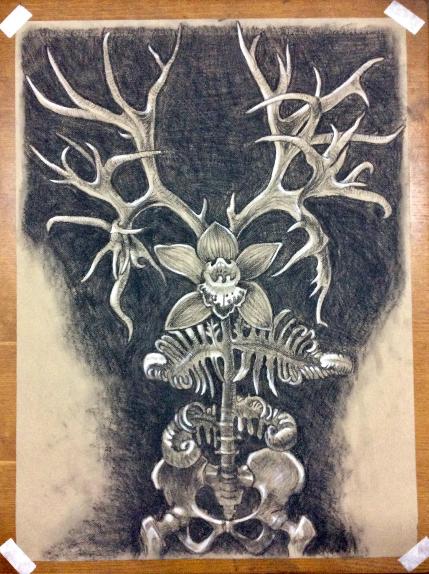
MY MAKING – I continued to produce my final artwork. By the time I had finished rendering the background, I had spent 6 hours on my drawing. I leant on a piece of paper towel to control smudging. I will clean up my drawing with a kneedable eraser toward the end. I still have to add shading to the antlers and orchid. I will probably try to darken the negative space. I am contemplating whether I proceed with my plan to add white for the high lights as I am pretty happy with the artwork with the single colour of black.
MY RESPONDING – The aesthetic qualities present in this art work are tone predominantly tone, shape, light, contrast, emphasis and proportion. It is hard for me to determine at this point whether this art work is unsettling or engaging as I am so invested in it. It looks very earthy to me as these are all elements of nature. The materials of brown paper and charcoal are also quite organic in their appearance. I even quite like the fingerprints, smudges and worked marks. They are all signs of the investment in time of a human hand, not the sleek art work produced by a computer.
LESSON 7 – work on final artwork
Making – Work on your final artwork in this lesson with the aim of presenting in the second half of next lesson.
-
Produce at least one finished artwork.
Responding – Consider what art elements and principles are being used to greatest effect in this art work. Note your findings in your visual diary for using to compose your final evaluation.
-
progressively evaluate and record in a visual diary the exploration and development of subject matter, art elements, art principles and use of materials and techniques to present aesthetic qualities
Differentiation
- Extending – After considering what art elements and principles you have used in your artwork, do an internet search of the same elements and principles found in famous artworks.
- Streamlining – Refer to the art elements and principle resource below. Which elements and principles can you see in your art work? Note these in your visual diary.
8. PRESENT AND EVALUATE FINAL ARTWORK.
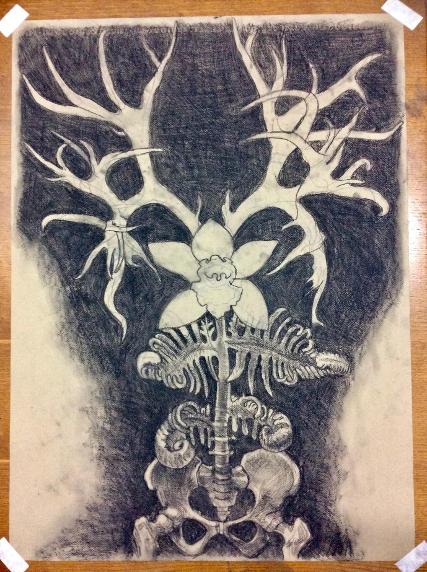
MY MAKING – After another 3 hours (9 hours total) my art work is complete. I sharpened edges and added white high lights to a few places which makes the art work pop. My charcoal pencils have nearly run out. Care should be taken when sharpening charcoal pencils as the lead breaks if you are too fast when turning the pencil in the sharpener.
MY RESPONDING
To evaluate my artwork, I referred to Studio Knack page 35 ‘Studio Practice - Evaluation’ (Gilligan and Grant, 2017).
My idea for this art work began with explorations of drawing techniques focusing on observation and representation. Exploration into bilateral drawing and blind contour drawing triggered interest about symmetry in nature. Philip Taaffe’s symmetrical paintings of symmetrical objects from nature supported my interest. I wanted there to be a connection with the cave art of our ancient ancestors so 2D art forms (like cave walls) were chosen. I examined instinctual drawing techniques like automatic drawing, bilateral drawing, bimanual drawing and blind contour drawing. I combine some of these techniques to develop something new, bilateral blind contour drawing. I experimented with a variety of mediums and settled on charcoal because of the connection with art making by ancient people. I chose subject matter that I intuited would have held the attention of cave artists and I imagined they might have been filled with wonder and awe at the symmetry in nature. The art elements and principles I used in this art work are tone, shape, light, contrast, emphasis and proportion. Tonal range produced with charcoal strongly established the previously mentioned elements and principles. I developed skills with new techniques I am keen to do extended experimentation with, particularly bilateral blind contour drawing and subtractive drawing with charcoal. I am very satisfied with the outcome. I find the finished drawing to be confronting and beautiful, ominous and engaging. Even though there is little sign of the bilateral blind contour drawing, I think the drawing is nicely reconciled.
LESSON 8 – finish, present and evaluate final art work
Making – 30 minutes to complete final art work. Offer students lunch time to work on art work so they don’t rush it and they can it their all.
-
Produce at least one finished artwork.
Responding – Students are to reflect on what their artwork is about. Evaluate the effectiveness of the artwork by using the evaluation questions on pg. 35 of Studio Knack (Gilligan and Grant, 2017). Students then present their artwork and evaluation to their peers. Class members are to give feedback about the art elements and principles they observe. Take note of their observations to assist in compiling evaluation of art work. .
-
Evaluate at least one finished artwork.
Differentiation
- Extending – Consider the most effective environment and presentation to exhibit your art work to full effect.
- Streamlining – Finish the two sentences below. Type and print the answers for your peers to read.
- My art work is about…
- The art elements and principles I used are…
© Copyright Ingrid Schmidt